Showing posts with label Guest Posts. Show all posts

Tuesday, May 29, 2012

{Guest Post} Facial Recipe!

Hey there readers! I'm Kaity, and I blog over at As We Grow. I'm all about sharing my findings and tips all about saving money where you would least expect it, cleaning and organizing, and natural and new ways of doing things! As well as some yummy recipes along the way! This is one of my favorite facial recipes I have ever come across, and altered to perfection!


This is something that I have been trying out, and LOVE. Since I have been pregnant with Tucker, I have discovered a lot more blackheads on my face. And this is not okay with this mama! I have always had pretty nice skin, so when all these unwelcome guests decided to land upon my chin.. I knew I had to do something about it. So, I dove into research. 
Here's what you'll need:
2 cups of water
5-8 drops of Lavender Oil {http://www.mydoterra.com/christacox/#/}
Handful of Basil (Fresh or Dried will do!)
Baking Soda
Here's what you'll need to do:
Step 1: Take your 2 cups of water, Lavender oil, and basil, and pop them into a pan on the stove
Step 2: Turn on stovetop to medium and let the mixture boil for about 5-6 minutes
Step 3: Once mixture has boiled for that time, pull off burner and pour into a bowl
Step 4: Pull back your hair, and place face over bowl letting the steam hit and absorb into your face. Do this for about 10 minutes. It's super relaxing and smells GREAT!
Step 5: Take your baking soda, and a little bit of water, and make into a paste. Massage thoroughly into skin. Let it dry.
Step 6: Wash baking soda off with cool water. Your skin will feel fresh and new! And blackheads will be saying bye-bye!
**I recommend doing this once a week. It will really help diminish the amount of blackheads you have, and of course, doing it more often, always brings better results!**
WHY these ingredients?
WHY Basil? 
Basil has been used for thousands of years to help treat different skin problems. The medicinal herb is especially great for acne problems because it has powerful ant-viral anti-inflammitory and antibacterial properties to it. 
WHY Lavender Oil? 
Lavender oil is great for clogged pores. It is a natural muscle relaxer, soothing agent, conditioner, and astringent. So not only, when you are doing the steam, does it smell great, but you are also absorbing all of active nutrients that come out of the oils, and penetrate your skin and pores.
WHY Baking Soda?
Baking soda has been found to be an amazing natural non-abrasive skin exfoliant! When you by exfoliants at the store, they contain harsh chemicals (Alpha Hydroxy Acid) that are used renew the layer of skin, by burning off the old one. Baking soda is a physical exfoliant, that instead of doing harm, it actually physically scrubs off the excess skin cells and dirt that is accumulating. 
So there you have it! A natural, easy (and smells really good too!) way of reducing and removing those pesky blackheads! 

-----------------------------------------
Thanks Kaity! You are awesome!

This was supposed to go up this weekend while i was gone but i didnt have internet at the cabin (only reception). So i apologize for my absence!


PLEASE vote for our blog daily!
Takes 2 clicks :)
Click the link below, then the LEFT brown bubble. THATS IT!
i REALLY appreciate it!
Vote For Us @ topbabyblogs.com!

Thursday, April 5, 2012

"Help Us Adopt"

Today i need your help :)
Guys, i would like to introduce to you my beautiful sister and her beautiful family that live here in Utah! 

Yolanda is my oldest sister who was raised in New Zealand! Awesome huh! She has the most beautiful accent, i am jealous of it. She has always been way outgoing and funny and just an awesome person to be around. She met her husband Dana who is from California. They have been married  for about 16 years now! Something like that. Pretty impressive now a days if you ask me.  They have always been fun and adventurous awesome couple that are fun to be around. They are very active and run marathons and all sorts of awesome things. They also remain very close to their Heavenly Father in the LDS church. Just true admirable people.
They were never able to have children of their own but through the amazing miracle of adoption, they were blessed with their son Landan in 2008. As a sibling to Yolanda i watched how Landan truly blessed and changed they're lives. I couldnt imagine life not having any siblings, and now they are looking to be blessed again with a second child
----------------------------------------------------------
Find their adoption page --->HERE<----
And my sister's personal blog --->HERE<---

How can you guys help?
Basically you can help by helping me spread the word about this sweet family trying to adopt.
If you know anyone who is choosing adoption, let them know of this amazing family looking to adopt!
Facebook about it, tweet about it, Pin it, any means of networking :)

Here is a button you can grab that links to their adoption page :)

DuJardin Adoption

This button that will link you to pinterest..
Re-pinning would be AWESOME!
(just click on it and from there you can re-pin)


Thank you so much anyone who helps! Its TRULY TRULY appreciated

Tuesday, December 6, 2011

Shelby: Christmas DIY Wooden Vase

Hi pretties! I'm Shelby Osmond and i have a Christmas DIY Tutorial for you today that i'm really excited to share! When I think of Christmas I think of a natural, organic smell and what better to bring that smell into your home than a wooden vase. Here is a short tutorial on how to create your own wooden vase or give it as a present! What you'll need: -Small branches -Wood glue -Vase -Brown spray paint-non-slick paint -plastic ornament
1. We first went to the mountains, picked up a couple of dead tree limbs and brought them home to be cut into 1 inch thick chips.
2. After they were cut we got a regular glass vase and sanded it down. Note: We sanded it down so that when we glued on the wood chips there would be texture to form to, instead of just sliding off the glass. 3. Use wood glue to glue on the wood chips: Note: This is the most fun trying to get the chips to fit its like a puzzle. 4. To make the glass look more uniform we spray painted the inside brown with a non-slick paint. 5. Sand plastic ornaments and glue on chips {same as before} 
Enjoy your new organic vases, hope you'll stop by and say hello!
Our looks is little more woodsy, but hey we saved $139 
craft

Monday, December 5, 2011

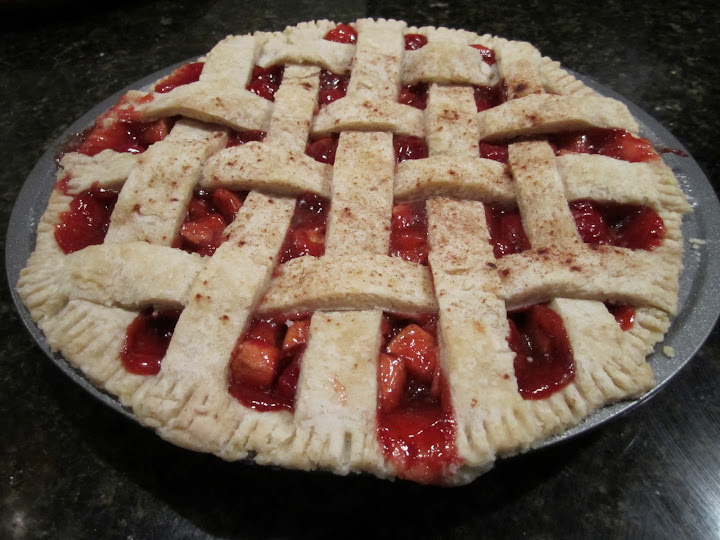
Lindsey: {Recipe} Holiday Cherry Apple Pie

Hey everyone! I am Lindsey from Lindseys and Wildflowers and I am so happy to be guest posting for Christa as I read her blog every day!
I thought I would share my recipe for me all-time favorite pie, Cherry Apple!
I make this pie for Thanksgiving and Christmas every year. It is always a big hit!

Cherry Apple Pie (makes 1 pie)
INGREDIENTS – CRUST (need to make 2)
2 cups all-purpose flour
1 tablespoon sugar
1 teaspoon cinnamon
3/4 cup cold Crisco
8-10 tablespoons ice cold water
INGREDIENTS – FILLING
1 can cherry pie filling (I prefer the double fruit kind)
3-4 granny smith apples
1/4 cup sugar
1 tablespoon cinnamon
DIRECTIONS – CRUST
  1. Combine the flour, sugar and cinnamon in a medium bowl.
  2. Cut in the Crisco until it forms pea-sized crumbles.
  3. Add water, starting with 5 tablespoons and mix with your hands. Keep adding water tablespoon by tablespoon until it forms into a ball.
  4. Wrap in plastic wrap and pat into a disk shape. Refrigerate for at least 30 minutes.
  5. Repeat to make one more dough.
  6. Roll out the dough until it is large enough for the pie tin. Using a knife cut the extra crust off.
  7. With the second dough, roll out and cut into strips for the lattice crust.
DIRECTIONS – FILLING
  1. Preheat oven to 350 degrees F.
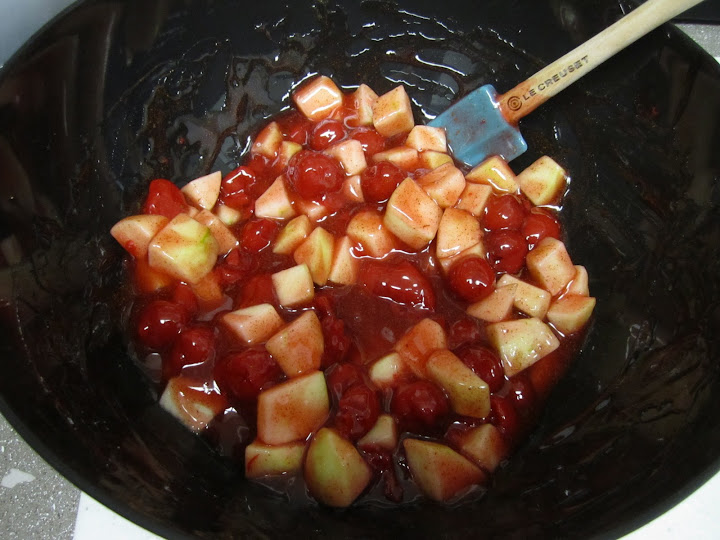
  2. Empty the cherry pie filling into a medium-sized bowl.
  3. Peel and chopped the apples and put into the bowl.
  4. Stir in the sugar and cinnamon.
  5. Dump into the pie tin.
  6. Make the lattice topping with strips of pie crust. Dust with more cinnamon sugar.
  7. Bake for an hour. Cool before serving!
I hope you guys enjoy this recipe! It is such a nice pairing! It actually was a happy accident and now it is my favorite pie!
Lindsey
J Lindsey

Sunday, December 4, 2011

Guest Post: Hollie DIY Jewelry Frame Holder!

Hi there! I'm Hollie (aka The Drama Mama)! I am wife to Robbie, mom to Kole (almost 10), Alexie (almost 8) and Kylie (almost 5), born and raised Texan but recently picked up and moved everything to Iowa, lover of ALL arts and crafts, addicted to Pinterest and absolutely L♥VE spending time with my family and friends! Because of this love affair I have with any type of project, I love making things for Christmas gifts (mainly for the woman in my family!). But Husband has been known to whip out some ridiculously good vintage signs as well!! Last year, I attempted my first jewelry frame holder, and I absolutely love it! I made this one for my mom.... I mean, who couldn't use one of these bad boys?! I love that there are so many possibilities as far as personalizing it to fit someone you love perfectly! And the best part....it is super easy to make! All you need is: 1 frame (any style, shape, color, size...options are endless!) 3 decorative knobs (again, personalize as you wish....use as many or as few knobs as you want) 1 frame stand (purchased mine from Hobby Lobby) screen material (purchased at Home Depot) scissors staple gun drill (and 1 handyman/handywoman that can drill holes in the frame for the knobs) Step 1: Take off the back of the frame and removed glass. Step 2: You can use the back of the frame to measure your piece of screen that will cover the back. Step 3: Staple the screen around the back of the frame. *Make sure you pull it nice and tight all the way around as you are stapling. If you don't, it will droop and not look as clean or finished. Step 4: Drill holes for knobs and screw in. Lastly, place jewelry frame on your stand and Voila!! How FUN is that?! Also, if you decide to make your own frame, leave me a comment....I'd L♥VE to see it!!

 Thank you again, sweet Christa, for letting me stop by and say hello to your readers!! Wishing you all a very Merry Christmas!! xoxo

Thursday, December 1, 2011

Jalynn: DIY Snowman Wreath!

Hi everyone!! I am Jalynn from the The Red Closet Diary.


 I am really excited to be guest posting today! I have been in a huge decorating kick lately and I figured it would be perfect to make something for Christmas. 


I searched and searched for the decoration I wanted to do. I am going to show you how to make a snowman wreath. 


The great thing about this project is it's not pricey for supplies and it literally takes five minutes to put it together!! 


What you need:


3 wreaths. The wreaths need to be different sizes to create the snowman look. I got my smallest wreath at Dollar Tree and my two bigger wreaths at Michaels Craft. The smallest wreath is 15 inches. The second one is 18 inches and the last one is 24 inches. 

Next you will need ties. You can probably use just about anything to attach the wreaths together but I found the ties to be the best.


Last, you will need accessories. You can put any kind of gloves or scarves or hats that you want!! 

This is how my snowman wreath turned out:


This was a fun project and like most, you can make it your own or personalize it and add something a little different!! I will be doing more great DIY's for the holidays and clothing DIY's, so stop by and check them out at www.theredclosetdiary.com

Happy Holidays!

Guest Posting BEGINS!


K guys so we will be on vacation for a good week! I will be on the beach while my home town gets blown away by 70mph winds (no joke). WE ARE GOING TO DISNEYLAND! I am so stoked!!!!! Braylee is going to just poop her pants with excitement. Ok maybe i will too. She gets OUT OF CONTROL excited when she see's any Disney princesses and Mickey Mouse and all them little critters haha.

We will stop in vegas for a day on the way there and also on the way back but there is NO WAY i am sitting in a car with a 2 year old for 10 hours straight haha.

Anyway. I have lined up some awesome guest posters posting about CHRISTMAS stuff! DIY projects, recipes and all that jazz! So make sure you keep in check :)

I also will still host my blog hop on Friday and will post my fitness post on Saturday like i promised where i will reveal how i lost 5 pounds in 2 weeks! Dont want to miss it :) They will just be scheduled in.

So dont miss out!
*pic found via google*

You best be ready for my return and all the pictures and videos!
Make sure you follow me on Twitter {--> CLICK HERE <-----}
And on my new fan page {--> CLICK HERE <---}
For play by play updates on our adventures!

PEACE OUT SUCKAS!
:)

LinkWithin

Related Posts Plugin for WordPress, Blogger...