Showing posts with label recipes. Show all posts

Friday, April 22, 2016

Baked Zucchini Fries! || Recipe


Ingredients:

  • 1 Zucchini
  • Egg (use 2 eggs if you want to substitute out milk)
  • 1/4 Cup Milk
  • 1/2 Cup Bread Crumbs {i used croutons}
  • 1/4 Cup Shredded Parmesan Cheese 


Directions:

  • Preheat oven to 425 degrees F
  • Mix Bread crumbs and cheese in 1 bowl
  • Milk and egg in a separate bowl
  • Roll zucchini strips in the milk/egg mixture first
  • then into the cheese and bread crumbs
  • place on sheet (line with tin foil for easier clean up
  • Bake for 20-25 minutes!

Please Share!


Follow me in INSTAGRAM !!


Subscribe for Emails on New posts!
(left side bar)
 Follow me on Bloglovin' 


Follow on Bloglovin  

Saturday, March 26, 2016

Easter Muddy Buddies {Puppy Chow} || Full Recipe


Ingredients:

9 Cups Chex Cereal
1/2 cup white chocolate chips
1/4 cup peanut butter
2 tablespoons butter
1/3 cup powdered sugar
1 Cup melted white chocolate (with pink/red food dye)
1 Cup melted white chocolate (with yellow or blue food dye)
         (Wilton Yellow Candy Melts work too)
1 Cup Mini Chocolate Eggs
   (any or all Eater candy! :)

Directions:

Place 3 Cups cereal in 3 separate bowls and set aside.

In a small microwavable bowl, microwave chocolate chips, peanut butter and butter uncovered on High for one minute and then stir until melted and smooth.

Pour peanut butter mixture over one of the bowls of cereal and stir until evenly coated.

Place the cereal mixture in a seal-able food storage bag  and add the powdered sugar.

Shake the bag until well coated then spread the cereal out on a baking sheet and allow to cool for 15 minutes.

Melt the 1 cup melted white chocolate, add food coloring, put in separate bowls until smooth then pour over a bowl of cereal each and stir until evenly coated. 
Spread the cereal directly out onto separate baking sheets and allow to cool for 15 minutes.

In serving bowl, mix the three cereal mixtures along with the chocolate eggs.


Ta-DA!


Thumbs up if you liked this and dont forget to share it!

MAKE SURE YOU SUBSCRIBE!


*Please share this video


Instagram{family/makeup}: http://instagram.com/christacox2
Snapchat: ChristaCox3
Periscope: ChristaCox3
Vine: Christa Cox
Kik: @ChristaCox3

Tuesday, June 11, 2013

Creamy Chicken Veggie Pie Pockets {Recipe}

I came across this recipe.. and it had me at cream cheese.
I have an obsession with cream cheese. Im a real health nut.
I just HAVE to share!


Ingredients
  • 4 oz Cream Cheese
  • 4 TBS Butter 
  • 1/4 tsp Onion Powder
  • 1/4 tsp Garlic Salt
  • 1 1/2 Cups Cooked and Shredded Chicken
  • 1 1/2 Cups frozen chopped broccoli 
  • 1/2 cup frozen corn
  • 1 box Pillsbury Pie Crust


INSTRUCTIONS

In a large microwave safe bowl, combine cream cheese and butter. 
Microwave in 15 second intervals until slightly melted and able to stir until smooth.

Add onion powder and garlic salt to cream cheese/butter mixture and stir well.
Add chicken, frozen chopped broccoli and frozen corn to cream cheese mixture. Stir until well combined.

Unroll both sheets of refrigerated pie crust dough. Cut each of the round pie crusts into quarters.

On one quarter of pie crust dough, put 1/4 of cream cheese/chicken mixture (about 3/4-1 cup.) Place a second quarter of pie crust dough over the top (make sure it lines up with bottom quarter)

 and pinch seams to seal off. You can flute the pie crust edges for a prettier look.

Repeat until you have 4 pie pockets.
 Cut about three small slits on the tops of each pie pocket for breathing. 

Place on a greased cookie sheet.
Bake at 400 degrees F for about 20 minutes or until tops are golden brown.

Best "Chicken Pot Pie" ive come across!
Feel free to Pin and share!!

Original recipe fore HERE

Saturday, February 23, 2013

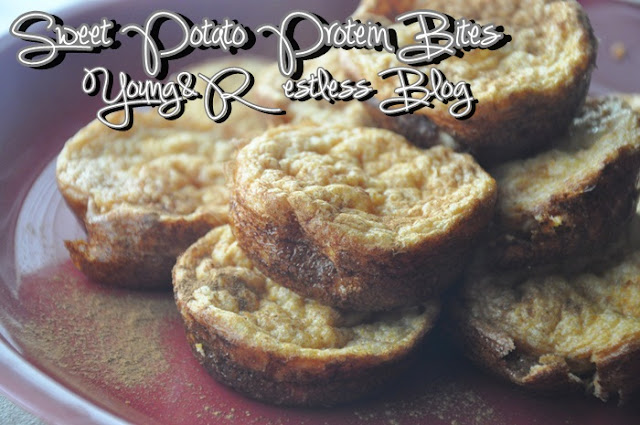
{Recipe} Sweet Potato Protein Bites

Ever try to start eating healthy, but find yourself wanting to snack, and when you go to do so, you realize you dont have any healthy snacks?

BIGGEST thing i run into with trying to eat clean!

So when i came across this recipe on pinterest, i HAD to try them!
I think it was the TWO INGREDIENTS thing that caught my eye!
They are also good to add to a fitness routine!
---------------------------------------------

Ingredients:
*1 cup mashed sweet potato
*8 egg whites
*1 teaspoon cinnamon (plus extra if desired)

Directions!:
  • Bake sweet potatoes in oven (or microwave) until fork tender. Let cool and scrape out flesh and mash gently with fork until smooth

  • Preheat oven to 375F. Combine all ingredients in a blender or large, immersion blender-friendly bowl. Blend together until very smooth - about 30 seconds (i used a beater. It just make the potato a little more chunky. I liked it that way)

  • Pour into lightly greased mini muffin tins (or you can line with liners), filling each tin about 2/3 of the way full

  • Bake for 20-25 minutes until toothpick inserted in center comes out clean. Remove from oven, let cool completely, then remove from tin and store in refrigerator.

 Each small bite contains 20 calories, 4g carbs, and 2g protein. A serving of 6 bites has 130 calories, 20g carbs, and 11g protein..
It was suggested tha adding almond butter on top is AMAZING! (and still healthy). :)
They taste just like sweet potato with cinnamon and don’t really have an “eggy” sort of taste of them.

ENJOY!
((Feel free to pin to pinterest!!)

Tuesday, May 29, 2012

{Guest Post} Facial Recipe!

Hey there readers! I'm Kaity, and I blog over at As We Grow. I'm all about sharing my findings and tips all about saving money where you would least expect it, cleaning and organizing, and natural and new ways of doing things! As well as some yummy recipes along the way! This is one of my favorite facial recipes I have ever come across, and altered to perfection!


This is something that I have been trying out, and LOVE. Since I have been pregnant with Tucker, I have discovered a lot more blackheads on my face. And this is not okay with this mama! I have always had pretty nice skin, so when all these unwelcome guests decided to land upon my chin.. I knew I had to do something about it. So, I dove into research. 
Here's what you'll need:
2 cups of water
5-8 drops of Lavender Oil {http://www.mydoterra.com/christacox/#/}
Handful of Basil (Fresh or Dried will do!)
Baking Soda
Here's what you'll need to do:
Step 1: Take your 2 cups of water, Lavender oil, and basil, and pop them into a pan on the stove
Step 2: Turn on stovetop to medium and let the mixture boil for about 5-6 minutes
Step 3: Once mixture has boiled for that time, pull off burner and pour into a bowl
Step 4: Pull back your hair, and place face over bowl letting the steam hit and absorb into your face. Do this for about 10 minutes. It's super relaxing and smells GREAT!
Step 5: Take your baking soda, and a little bit of water, and make into a paste. Massage thoroughly into skin. Let it dry.
Step 6: Wash baking soda off with cool water. Your skin will feel fresh and new! And blackheads will be saying bye-bye!
**I recommend doing this once a week. It will really help diminish the amount of blackheads you have, and of course, doing it more often, always brings better results!**
WHY these ingredients?
WHY Basil? 
Basil has been used for thousands of years to help treat different skin problems. The medicinal herb is especially great for acne problems because it has powerful ant-viral anti-inflammitory and antibacterial properties to it. 
WHY Lavender Oil? 
Lavender oil is great for clogged pores. It is a natural muscle relaxer, soothing agent, conditioner, and astringent. So not only, when you are doing the steam, does it smell great, but you are also absorbing all of active nutrients that come out of the oils, and penetrate your skin and pores.
WHY Baking Soda?
Baking soda has been found to be an amazing natural non-abrasive skin exfoliant! When you by exfoliants at the store, they contain harsh chemicals (Alpha Hydroxy Acid) that are used renew the layer of skin, by burning off the old one. Baking soda is a physical exfoliant, that instead of doing harm, it actually physically scrubs off the excess skin cells and dirt that is accumulating. 
So there you have it! A natural, easy (and smells really good too!) way of reducing and removing those pesky blackheads! 

-----------------------------------------
Thanks Kaity! You are awesome!

This was supposed to go up this weekend while i was gone but i didnt have internet at the cabin (only reception). So i apologize for my absence!


PLEASE vote for our blog daily!
Takes 2 clicks :)
Click the link below, then the LEFT brown bubble. THATS IT!
i REALLY appreciate it!
Vote For Us @ topbabyblogs.com!

Tuesday, April 3, 2012

Lemon Brownies {Recipe}

I haven't done a recipe in a while!
So today im gonna break the ice :)

Lemon Brownies!
(Found on Pinterest, via Rita's Recipes)

These are like lemon bars, but with a more dense brownie texture!
Soooo yummy! And very natural tasting.

You will need:
3/4 C Flour
3/4 C Sugar
1/4 tsp Salt
1 stick butter (or 1/2 cup margarine)
2 Eggs
Juice from 1/2 Lemon (about 1Tbl)
Zest from 1/2 lemon (about 1 tsp)
Powdered sugar (for glaze)

Combine the flour, sugar, and salt in a large bowl.
Mix in the softened butter.

in another bowl, whisk the eggs with the lemon juice and zest
Add to the larger bowl and mix well.
Pour into prepared 8X8 brownie pan 
(make sure you spray with cooking spray or butter)

BAKE AT 350 FOR 25 MINUTES!
(you can double the recipe and bake in a 9x13 pan for 30 min)

Remove and LET COOL,
then glaze :)

GLAZE:
1/2 Cup powdered sugar
1Tbs lemon juice
additional lemon zest
stir together


Seriously SO yummy!
Try it out and let me know how you like it!

(feel free to pin it)

Tuesday, December 20, 2011

{Recipe} Holiday Candy Yams

{Half eaten} I couldnt even get a pic quick enough!

I cant even tell you how yummy these are, you just gotta make it and try it!

YOU WILL NEED:
* 40oz can of yams
* 1/2 cup chopped peacans
* 1/2 cup coconut
* 1/2 cup firmly packed brown sugar
* 1/4 cup flour
* 1/4 cup margarine or butter, melted

HEAT OVEN TO 350 DEGREES F.

place drained yams in ungreased, 2 quart casserole or baking dish.


in a small bowl,
combine remaining ingredients


blend well and spread over top of the yams

Bake at 350F for 35-40 minutes or until bubbly!
serves 10


(i left a spot in case some didnt like pecans or coconut)

Enjoy and happy holidays!

Monday, December 5, 2011

Lindsey: {Recipe} Holiday Cherry Apple Pie

Hey everyone! I am Lindsey from Lindseys and Wildflowers and I am so happy to be guest posting for Christa as I read her blog every day!
I thought I would share my recipe for me all-time favorite pie, Cherry Apple!
I make this pie for Thanksgiving and Christmas every year. It is always a big hit!

Cherry Apple Pie (makes 1 pie)
INGREDIENTS – CRUST (need to make 2)
2 cups all-purpose flour
1 tablespoon sugar
1 teaspoon cinnamon
3/4 cup cold Crisco
8-10 tablespoons ice cold water
INGREDIENTS – FILLING
1 can cherry pie filling (I prefer the double fruit kind)
3-4 granny smith apples
1/4 cup sugar
1 tablespoon cinnamon
DIRECTIONS – CRUST
  1. Combine the flour, sugar and cinnamon in a medium bowl.
  2. Cut in the Crisco until it forms pea-sized crumbles.
  3. Add water, starting with 5 tablespoons and mix with your hands. Keep adding water tablespoon by tablespoon until it forms into a ball.
  4. Wrap in plastic wrap and pat into a disk shape. Refrigerate for at least 30 minutes.
  5. Repeat to make one more dough.
  6. Roll out the dough until it is large enough for the pie tin. Using a knife cut the extra crust off.
  7. With the second dough, roll out and cut into strips for the lattice crust.
DIRECTIONS – FILLING
  1. Preheat oven to 350 degrees F.
  2. Empty the cherry pie filling into a medium-sized bowl.
  3. Peel and chopped the apples and put into the bowl.
  4. Stir in the sugar and cinnamon.
  5. Dump into the pie tin.
  6. Make the lattice topping with strips of pie crust. Dust with more cinnamon sugar.
  7. Bake for an hour. Cool before serving!
I hope you guys enjoy this recipe! It is such a nice pairing! It actually was a happy accident and now it is my favorite pie!
Lindsey
J Lindsey

LinkWithin

Related Posts Plugin for WordPress, Blogger...